Zunky Chic


Home                 About                 Contact

Monday, February 3, 2014

Birthday Tiara

We recently attended a surprise birthday party for one of Husband's co-workers. Since she also loves to craft, I knew I had to make something extra special for the occasion. In addition to a pretty card:


...I made my first tiara to help her celebrate the big day.


I cut a pattern from a piece of bristol paper, since it's sturdy and the longest type of paper I had. I used the pattern to cut two pieces of fabric. I used spray adhesive to sandwich the bristol between the two pieces of fabric and then I stitched along the edges to make sure the crown wouldn't come apart.


I added a large crepe paper rosette to the front, with glittered numbers.


Vintage flowers, tatted doilies, and sparkly stars accent it.


And a fluffy crepe paper ruffle with pom pom trim finish off the bottom.

This was my first attempt at making a tiara, but it certainly won't be my last! I can't wait to make more. I think I'll have one to wear for every holiday!


Labels: , , , , ,

Tuesday, February 12, 2013

Wonder

I submitted this canvas project for last week's Swirlydoos Design Team challenge. Our challenge was to create a dimensional canvas project using a variety of mediums.


I started by painting a background using watercolors. Then I used a stencil and modelling paste to create the butterflies, which I then painted with glimmer watercolors. I misted the canvas with pearl Glimmer Mist and added some vintage paper scraps as a base for my photo. I added some white gesso to the paper to mute the colors even more.


I added a layer of tea dyed cheesecloth and vintage tulle trim beneath my photo of Lily Munchkin frolicking in the sand.


I used a large swirl from Dusty Attic as a frame for the photo. I painted and inked the swirl and added Diamond Dust glitter here and there along with some tiny flowers.
  
Unfortunately, I won't be continuing on in the challenge, but I had fun creating!
  

Labels: , , , , , , ,

Friday, December 21, 2012

Pink Christmas

It is no secret that I love pink. My craft room is the perfect shade of ballet pink, so I wanted some decor to match for Christmas.

I put one of those no-mess stick-on hooks on my craft room door and just threw up a few things I had on hand - ruffled crepe paper, lace trim, a glittered sign, and vintage bells look so "put together."


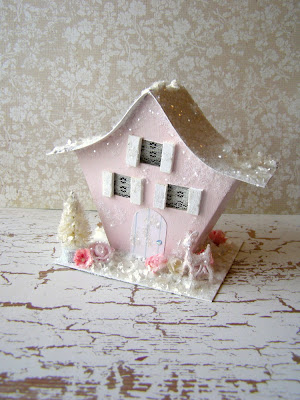
While I was at it, I wanted to try making some paper houses. Here is the only one I finished, but I'm planning on more. Let me show you how I made it.


First, I drew the front panel on a piece of printer paper, cut it out twice and then measured and cut out two rectangles for the sides. Then I taped the pieces together to form a pattern. I added a tab on one end to use to glue the house together. I also cut out a long rectangle that will be the roof. It is slightly wider than the side rectangles and a little wider than the front/back piece so it will have a nice overhang.


I traced my paper pattern onto a recycled cereal box and cut it out. Once cut out, I scored all the fold lines (the tape "joints" of my paper pattern). I also cut the roof piece and scored it, and cut out a 4" square base.


I applied gesso to all of the pieces, and then a couple of coats of craft paint - white for the roof and base and pink (or turquoise) for the house. Then I added a layer of white pearl paint to all the pieces.


Before gluing everything together, I used my craft knife to cut out three small windows. I used small pieces of wood for shutters and added a piece of lace behind each window for curtains. I made a paper door from a scrap of lined paper - perfect for replicating wood slats.


I glued the house together using the tab to join the two ends together. Then I glued the house to the base and glued on the roof.


Then the fun of decorating began! I added Delta's Decorative Snow here and there on the roof and base to create piles of snow. Then I added my decorations on the base - a painted deer (brown would not have matched), a bleached tree, and pink and white roses.


I applied glue to the entire roof and base, and here and there on the walls of the house and sprinkled clear glitter over everything.


After shaking off the excess and allowing to dry, I applied more glue here and there and added mica flakes for even more sparkle.


Since I didn't get the turquoise house finished in time for Christmas, I'm thinking an Easter house would be perfect!
 

Labels: , , , , ,

Wednesday, December 19, 2012

Sparkling Rosette Ornament

I can't stop making ornaments! I bought a sparkling starburst ornament at the dollar store, knowing I could do something with it to make it pretty.

First, I made a large paper rosette out of sheet music, then I added a sewing pattern ruffled flower on top of the rosette. I found this adorable image in my stash and decided she would be a great centerpiece.


I further embellished with a silk poinsettia, glittered holly leaves, a little greenery, and a shiny Merry Christmas ornament.
 

My tree is already so full of ornaments, but I have a couple more that I am working on.
 

Labels: , , , , , ,