Zunky Chic


Home                 About                 Contact

Wednesday, February 20, 2013

Ancestors

This mini album was recently published in the Create: Vintage magazine.

I combined pages from two Melissa Frances chipboard albums I had in my stash, and overly embellished each page to create an old, collected feel for the book.


On the cover, I used old lace trim, a crochet doily, vintage millinery flowers, and other embellishments to set the tone.


On the inside pages, I added old family photos with a little history about each person. This is my mom as a baby.


And my dad:


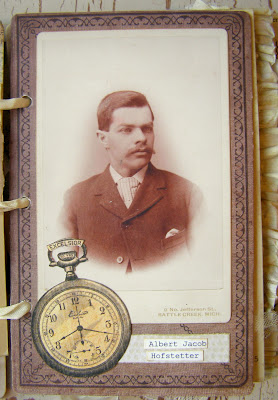
I found photos of ancestors through distant cousins online and from ancestry.com. This was my great-grandfather, whom my father never even met, nor did we know (until last year) that he was buried in my hometown where my family still lives.


Another great-great-grandfather, who served in Civil War. I was even able to find a list of all the battles he fought in.


More ancestors from my grandmother's side. Her family lived in the same two counties in New Jersey (and helped establish Salem County, NJ) for more than two centuries.


My favorite photos of my grandmother:


My grandfather and his siblings. A large version of this photo hung in my grandparents house until the end. It is a favorite, and I was so happy to find a third cousin through ancestry.com who could email a copy of it to me.


My grandfather, the sailor.


This book has become a treasured heirloom that I plan to pass on to my Lily Munchkin when she's all grown up, but I won't rush that!


Labels: , , , , ,

Wednesday, May 16, 2012

Disney Mini Album

We spent Christmas with our families at Disney World. I made a mini album to capture my favorite memories and photos.

Here is the cover, and just a few of the inside pages.


I bought a stack of chipboard albums when they were on sale at Michael's for about 10 cents, and used one for this album. I used the chipboard pages as "tabs" - one for each park and for the cover and back.


I used primarily Webster's Pages paper, and filled the book with glitter! I used glittered paper, glittered flowers, glittered Christmas picks...


I added a couple of tags and envelopes here and there.


Even though it was a Christmas celebration, I knew I had a lot of pink and pastel photos, so I used these colors throughout the album.


For this page, I used pieces of glittered Christmas picks to look like coral and sea ferns around the photo of Lily Munchkin and Nemo. 


Of course, we did a princess breakfast. Lily loved the "kid parade" through the dining room.


We met all of her favorites, except Ariel.


We had a wonderful time and would love to do it all over again!
 

Labels: ,

Monday, March 19, 2012

Welcome Babies

Our good friends are expecting their first babies in a few months - twin girls. As they await the girls' arrival, I prepared them to capture their favorite photos and memories.

I love the new Little Darlings collection from Graphic 45. I used it to make the card and the memory album.

For the card, I also used new Prima paper and flowers, as well as a new Graphic 45 stamp.


Here is the cover of the mini album:


And here is a look at some of the inside pages.


I used a Maya Road binder album as the base and covered the pages with the gorgeous Graphic 45 paper. I also added a few other pages for interest - chipboard shapes and envelopes.


For embellishments, I added vintage lace trims, Prima flowers, and some vintage baby images.


I have a few old baby albums, including one from my husband's great-grandmother. I scanned the images and edited to use as embellishments.


I made a pocket on this page using one of the vintage images.


Mom and Dad can tuck notes to their daughters in the envelopes. This one is embellished with an image from one of my dad's baby cards.
 

I can't wait to see the beautiful photos they fill the album with.
  

Labels: , ,

Wednesday, March 14, 2012

Road Trip

Last Christmas, my family took a vacation to Disney World. My NJ family drove down, and stopped in SC at South of the Border. My niece loved posing with all the tacky statues that cover the property. She had to get a photo with every one of them.

I made a mini album for her so she has a special memento of her trip. Here are a few pics of the album.

I went through my stash and found the brightest, most colorful paper I had.


I kept the embellishments simple since the papers and photos are so full of color and pattern.


I added heart-shaped eyelets to each page, to make them sturdier for a 4-year-old to handle, and to continue the "love" theme.


Of course, we needed touches of glitter and bling throughout.
 

Labels:

Monday, October 10, 2011

The Magic of Oz

For Halloween, my niece is going to be Daphne from Scooby Doo. She has a list of Halloween costumes for the next ten years, which include Mary Poppins, Dorothy, Ariel, and just about every princess Disney ever thought up, including Tinkerbell. Her favorite movies to watch right now are Mary Poppins and The Wizard of Oz. I bought some of the fabulous Graphic 45 Magic of Oz papers and got busy putting together a paper bag album.

It's still a work in progress, as I haven't had a chance to really dress up all the pages yet. But I'll show you what I've got so far (as it may NEVER actually get completed).

Here is the cover:


And a few of my favorite pages inside. I wasn't picky about which story I followed - I used images from the movie, an old book, and the Graphic 45 papers.


Since it's a paper bag album, it must have tags tucked in the pockets.


I used an image of L. Frank Baum on this tag.


I used images from my book on these tags:


Everything seems like it needs more bling, to match the spectacle of the yellow bring road, the ruby slippers, the Emerald City, and all that magic.

I remember being a kid and watching The Wizard of Oz on TV, and loving the part when Dorothy walks into Munchkinland. I think this is my niece's favorite part, too. And she asks all kinds of questions - What was under that house? Why are the munchkins scared? How did Dorothy get those shoes? She's so full of awe and wonder. It will be sad when she outgrows it all.
 

Labels: , , , ,

Friday, August 19, 2011

Vacation Mini Album

I've started making mini albums for our vacation photos because I can complete them so much quicker than a regular album. I finally finished the mini book for our trip to Savannah and Charleston. Here are a few photos of some of the pages.

For the cover, I used a combination of vintage and new patterned papers. I cut the gate from a piece of Prima paper I've been saving. It echoes the ornate iron work that we saw throughout Charleston. I tied antique lace trims to the binder rings.


Inside, I kept the pages soft and romantic. I used a color scheme of pinks, greens, and beige. I went through my paper stash and pulled out all my favorites from Prima, Webster's Pages, Basic Grey, Creative Imaginations, and K&Co.


I tucked journaling in here and there and used vintage pieces throughout.


I typed all of the journaling on my old typewriter. Here I am at lunch at Paula Deen's The Lady and Sons in Savannah.


We also visited a few old plantations outside of Savannah.


We took a bike ride through historic Charleston, which allowed us to get up close to the beautiful homes and architecture.


The cities and towns in Georgia and South Carolina have beautiful cemeteries. Lush foliage and flowers, old stones, and ornate statues.

Because the pages of my book are 8"x8", I had minimal space for multiple photos on a page. I made flip-up and pull-out pages where needed. Here's an example of one.


Upon opening the photo, I have another photo and the journaling.


On this page, I used paper that reflected the iron work of the gate in the photo.


Lifting the photo reveals a secret garden, which is exactly what the real garden felt like.


I love old architecture, especially churches. I put together a compilation of the photos of historic Charleston churches that we visited.


Opening the page:


And opening again:


I also kept the embellishments on each page to a minimum since I was relying on the paper's patterns to blend with the photos and feel of the locations.


I made this background by combining several scraps of vintage papers. It had the "assembled" look that I wanted. I secured the photo using masking tape, to further reflect the assembled feel.


I made the last page using a piece of printed canvas, which I cut to size, allowing for the bottom to fold over to create a pocket. I placed postcards, brochures, tickets, and other mementos from our trip in this pocket.


We had a wonderful time on this vacation and now we can finally reminisce about our trip while we look at the photos.
 

Labels: , ,